Bypassing the Vivo Fibra Box ONU on VIVO Fibra

- São Paulo Interior, VIVO Region 1 (Mogi Guaçu)
- Askey Vivo Fibra Box (RTF8115VW-SV), manufactured by Inventus
- FS.com GPON ONU stick
Finding GPON details
- Login to the Vivo Fibra Box
- Go to http://<Vivo Fibra Box IP>/instalador (ex. http://192.168.15.1/instalador)
- Write down the following information:
- Número de Série GPON (a.k.a. GPON Serial Number)
- SLID (a.k.a. PLOAM)
- Endereço MAC da LAN (a.k.a. GPON MAC Address)
GPON ONU Stick details
- PLOAM Password: GPON Serial Number (ex. INVP1234567890)
- PON/OMCI Vendor ID: First 4 letters of the GPON Serial Number (ex. INVP)
- OMCI Hardware Version: RTF3505VW-N1
- OMCI Software/Image Version 0: R3505VWN1001
- OMCI Software/Image Version 1: R3505VWN1001
Flashing the GPON ONU Stick
If available, serial UART access to the ONU stick is recommended in case of any failures (ex. flashing failure).
- Download the "6BA1896SPLQA42_MODDED_ver5-1.img" image
- Copy the image to /tmp on the ONU stick
- One method is using SCP, but modern clients may have compatibility issues with the SSH encryption used by the ONU Stick
- I used a Mikrotik RouterOS router as a middleman to copy files with SCP between the stick and my MacBook
- Flash the image using the following comands
- mtd -e image1 write <image relative file path> image1
- fw_setenv committed_image 1
- fw_setenv image1_is_valid 1
- reboot
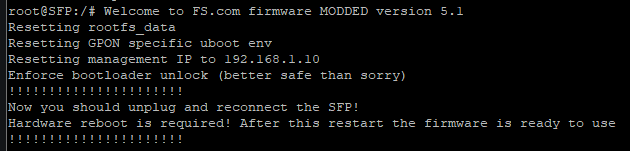
- After the reboot, telnet to "192.168.1.10" (no login required) and run the command "firstboot".
- You will see the serial output in the image below after it is finished.
- Reboot the ONU with "reboot". You may need to reset your SFP interface to gain access to the stick again after this reboot
- The ONU stick management will now be reachable at 192.168.1.10 over SSH using the login root:root
Configuring the GPON ONU Stick
Reference Adrenaline Post for OMCI information
- SSH to the ONU stick and run the following commands
- Set the GPON SLID (a.k.a. GPON PLOAM)
- fw_setenv onu_ploam <GPON SLID>
- Set the GPON Serial Number
- fw_setenv onu_serial <GPON Serial Number>
- Set the OMCI vendor ID
- fw_setenv omci_vendor_id <PON/OMCI Vendor ID>
- The vendor ID is usually the first 4 characters of the serial (e.g. "INVP")
- Set the OMCI equipment ID
- fw_setenv omci_equip_id RTF8115VW
- Set the OMCI hardware version
- fw_setenv omci_hw_ver RTF3505VW-N1
- Alternative: fw_setenv omci_hw_ver GG-GAPL100v02
- Set the OMCI software versions on image1 (the FS Modded image)
- fw_setenv image1_version R3505VWN1001
- Alternative: fw_setenv image1_version GG-11000-C003
- Set the ONU Stick MAC address
- uci set network.lct.macaddr=<GPON MAC Address>
- uci commit network.lct.macaddr=<GPON MAC Address>
- Reboot the ONU stick
- reboot
Router Configuration
- VIVO Region 1 uses VLAN 10 for Internet/WAN
- PPPoE is used for IPv4 and DHCPv6-PD is used for IPv6
- PPPoE Login:
- Username: cliente@cliente
- Password: cliente